September 7th 2015
In a return to some wide-field astrophotography, I chose to set up the camera, the mount and the laptop again for another go. This time however, I wanted to look at it's potential for giving me more immediate results. To do this, I concentrated on the JPEG photos that were being taken, and the settings that would allow me to get as much detail as possible in a single shot. This is as opposed to multiple frames being stacked and processed at a later date. I felt that the best way to do this was to concentrate on a specific constellation. One that would fit into the field of view of the camera, and that would be recognised with relative ease. I have found that previously, when photographing the night sky, that it is possible to get so many stars show up in the frame, that it's difficult to identify the constellation itself.
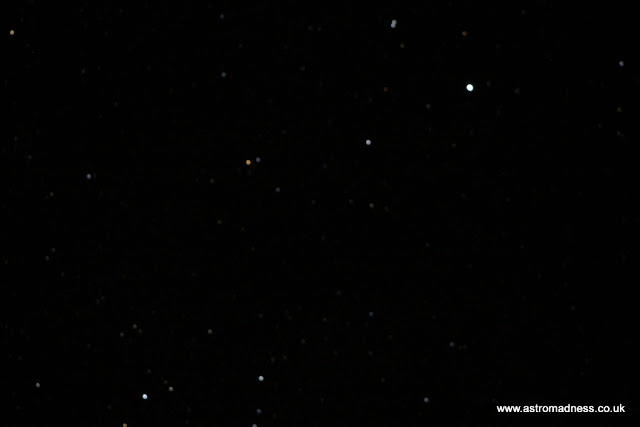
My first target was going to be the constellation of Lyra. It's currently high up in the Summer nights sky by 9 or 10pm meaning that there is less atmosphere for the light to travel through before entering the lens of the camera and going on to hit the sensor. I found that the best way to make sure that I had the whole constellation in frame was to set the aperture of the camera to as low as setting as possible, and then to set the ISO as high as possible. This meant that I could take reasonably short exposures, see the results, carry out any tweaks to the position of the camera, and perhaps the most important thing, to carry out any focus adjustments. Once I was happy with this, I was then able to reduce the ISO setting, having the effect of reducing the background 'noise' in the picture ensuring that the stars were exposed, but the general background was much darker. This give much better contrast, but took longer to get the shots that I wanted. Below, I've put together 3 images taken during the process. The first shows the outcome of the test shot for alignment and focus. The second is one is annotated with the names of the stars that make the constellation, with some lines to see how the stars are connected up in the constellation picture. Finally, the third image is without annotation.
 |
| f/4.5, 3 second exposure, ISO -3200, 125mm focal length |
 |
| f/4.5, 239 second exposure, ISO - 400, 125mm focal length |
 |
| f/4.5, 239 second exposure, ISO - 400, 125mm focal length |
Once I had taken these pictures, I began to study them to see if I had caught anything recognisable within the constellation. I was amazed and really pleased to find that I had caught a feature in the bottom part of the constellation. The positioning is correct and therefor, I found that I have caught the fine M57 - The Ring Nebula. In a photo, it looks fairly unimpressive, other than appearing in my picture as an electric blue spot, which could easily be mistaken for just another star I suppose. I've pointed it out on the marked picture to help readers see what I am referring to.
It is apparent that on top of the actual waiting around for exposure time to pass, astrophotography is generally a very time consuming activity. This makes it all the more important to get things as good as possible before committing yourself to taking your final shot or shots.
The next constellation I looked at was Cassiopeia. Again, the process I followed was to take several test shots for positioning and focus before moving onto a longer exposure. I also changed the ISO value to a higher setting, but also decreased exposure time on the final image so I could compare the effect this has on the final single shot outcome. The first image is annotated, and the second is the original. The final photo does show some signs of apparently being out of focus. This might have been the case, but the biggest issue I had was trying to keep the lens free from dew. Once I had cleared the dew, I only seemed to get a couple of minutes before finding the lens was misted up again and an exposure of any longer was pointless.
 |
| f/4, 59 second exposure, ISO - 800, 75mm focal length |
There is a definite difference in picture, despite taking into account the issues with dew. My conclusions from the experience gained taking these couple of shots is that the f/stop number is about right. Keeping it reasonably low seemed to work well, although the reasons why I don't really know much about at the moment. The biggest difference come in the ISO settings. A lower ISO meant the image for a one off exposure appeared much cleaner. A better contrast was given between the light from the captured stars, and the darkness of the background sky. And finally, the exposure time helped determine how much important data was captured by the cameras sensor, and helped bring out individual stars better.
From here, I think given a reasonable opportunity, I would like to look at another constellation, or at least part of one. Perhaps the great square in Hercules, which also contains some clusters. With the right ISO settings and exposure time, I would like to think that I could start to pick some of these details out. I would like to try exposure times of 5 to 10 minutes. This would test out the tracking abilities of the mount, and also my polar alignment skills! In addition to Hercules, I think Delphinus might also be a worthwhile target. A small constellation that could fit within a single frame in its entirety. For now though, I shall need to pack the mount away ready for the journey home.


Comments
Post a Comment