Mini Series Part 3 - First light with the 26c
Hello, and welcome to this third and final post in this mini series where I have been writing about and explaining how I have upgraded my camera and imaging train from my old Altair 183c fan cooled hypercam to a new Altair 26c TEC cooled replacement. In part 1, I looked at adding the camera to my imaging rig and adjusting the spacing to get the correct amount of distance between the camera sensor and focal reducer. In part 2, I moved onto using some nifty tools in Sharpcap to complete a sensor analysis, achieve focus and using the brain function in the Smart Histogram to work out what camera settings to use for my imaging run. At last, now we are ready for first light!
It's all about M51
Over the last 3 years or so, I have managed to refine my imaging process quite nicely, so now usually, providing nothing goes amiss, I can be up and running in about 10 minutes from switching on the observatory PC to returning to the comfort of the living room indoors and leaving the kit do it's thing. The checklist after powering everything on goes something like...

 |
| ...plate solving the target to get it centre in the frame, and start multi star guiding in PHD2... |
 |
| ...applying the recommended settings acquired from the smart histogram brain function and starting to collect my subframes... |
 |
| ...and with everything playing together nicely, throw in some dithering and we're good for the rest of the evening. |
After the main event of imaging, I also needed to collect a library of flat and dark calibration frames. One of the big advantages of a TEC cooled camera is that I am no longer constrained to taking my dark frames the same night at the same temperature of the light frames. TEC cooling allows me to cool the camera sensor down to a consistent temperature and take them at a more convenient time for me.
Tiredness strikes
The following morning, I collected my calibration frames with the intention of processing the data in the coming evenings. A word on calibration frames... When I first started using the old 183c camera, it soon became evident from research and asking questions, that the way to go with that particular camera was to only use flats, lights and dark frames. No bias frames were needed as they seem to cause more issues that they solved. So, unsure what to do with the 26c, for first light, I stuck to the same process and only took lights, darks and flats. In the coming Summer months, I'll be looking more into that process, but that's for another post at another time.
The final image and Astrometry.net
My first light image using 2 out of 3 hours of intended data and my pretty standard Pixinsight workflow has been finished. It's rather pleasing to say the least. The colours, contrast and detail in the pair of galaxies are so much better that I have achieve previously. And to also think that in the processing phase, nothing special and different was tried out. I can't wait to see what this camera produces when I start to learn more about it.
Finally, when I produced my final image, I noticed galaxies that I have never seen in my previous images of M51 before. What were they? Was I seeing things? Well, there was one easy way to find out. I uploaded my image to astrometry.net which then plate solved and analysed my image. Aside from a bunch of things which I knew nothing about, it also produces a copy of your image with other targets marked in it with their identifiers. It's an excellent tool which I shall use more in the future. Often I have produced an image and seen a whole manner of other things in the final image which I didn't know were there. This tool will allow me to identify those in the future very easily.
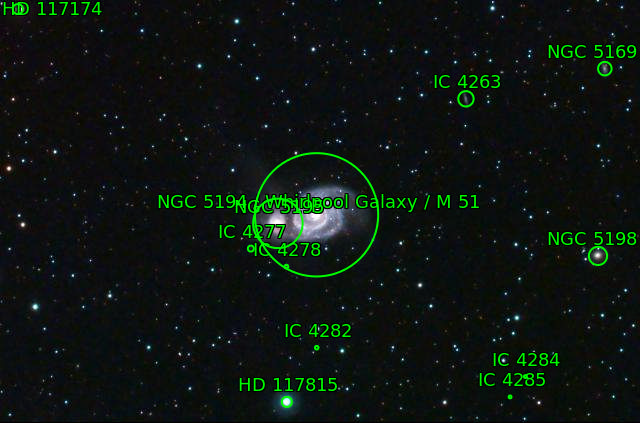 |
| A crop of the first list image, plate solved in astrometry.net with the identities of other targets in the field of view. |
 |
| The final image, cropped from the full sized image to frame the galaxy better. |
| The full sized image in all it's glory. |
That brings to a conclusion this mini series of posts on my first forays of using the Altair 26c. Now starts the process of revisiting all my old targets in search of improvements, and the challenges ahead of trying new targets to try and really put this camera to work.
I hope you've enjoyed reading this mini series, and thank you if you've managed to stick it out for it's entirety 😂. Until next time, clear skies!


Comments
Post a Comment