Starwave 80 ED-R – A review
Starwave 80 ED-R – A review
As readers of my posts know, around early January 2017, I
took delivery of my very first refractor with a view of developing my interest
in Astrophotography. While I haven’t
used it as much as I would like to have by now (primarily because of the
weather), I have at least had some use out if it. Enough so I feel I can now put my first
impressions of the new scope to type.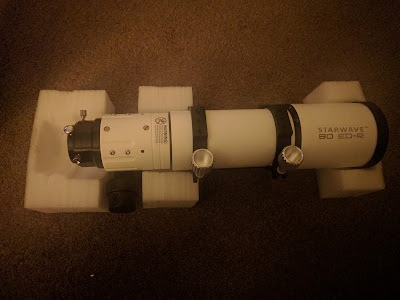
Mt first impression was that it’s a solid piece
of kit. It’s well manufactured and
finished extremely well. A very gentle
shake (always a good test!) suggested that there was no movement in any of its
components. Nothing loose or
rattling. I was slightly disappointed at the point of ordering the scope to learn that a case was not included for this refractor. The cardboard and foam packaging won't last too long in damp late night observing conditions, so it is worth considering the extra expense that will be required to buy or build a suitable case.
Once out the box, one of the first jobs to do is to locate the small mounting plate for attaching a finder scope, and attach it to the scope. It's quite easy, just a couple of hexagonal bolts which are already in situ in the side of the scope are all that are needed.

 |
| The fitted mounting plate for a finder scope or guide scope. |
Before I could do much else, I
needed to put the scope onto a mount which would then allow me to get a proper
look at it. The scope came mounted in
it’s rings and with a dovetail bar attached which meant that I could get it on
the mount straight away. In that sense,
it was ready to go straight out of the box.
Very simple, very easy.
The telescope comes with an short extendable dew shield
with is pushed out and held in place by friction. Although, after several times of setting this
scope, and then packing it away again, this is becoming a little loose. However, there are 3 small grub screws in
place that can be turned slightly to help the dew shield stay in place. I will need to remember to loosen these off
each time in case they start to mark the tube of the refractor over time. An excellent touch is the cap for the scope. One of my reflector telescopes came with a
plastic cap for the end of the tube which was fine. But the dobsonian telescope come with a
shower cap style cap for the secondary end.
It’s inevitably going to get lost or torn at some point. But, the cap for the refractor is a really
snug fitting metallic cap which fits really well. It doesn’t take too much effort to remove it,
and you certainly don’t need to give it a series of sharps taps to put it on.
At the other end, the focuser is smooth as they
come. My other two scopes are
reflectors. One has the factory fitted
Crayford style focuser and the other has an upgraded dual speed focuser. Both very capable and suitable focusers. In terms of focus action though, this rack
and pinion focuser is so smooth. It is
dual speed for the fine-tuning capabilities oh so very important to
astrophotography. There is also a small
thumbscrew under the focuser to lock the focus into place, critical for imaging.
Staying at the focuser end of the scope, the 80 ED-R
comes with a 2” to 1 ¼” adaptor for eyepieces.
To start with, I only wanted to use the new scope for photography, but I
soon decided that it would be better to use it as a travel scope as well as for
AP, and therefor would also need a 2” diagonal as an add on. As I found, this was also required to achieve
focus with an eyepiece in place.
My attempts at astrophotography involve me using my Canon
EOS 1100D DSLR. When I bought the
refractor, I also bought a reducer to use in conjunction with the DSLR. Fitting the DSLR with reducer and adaptor is
all very straight forward. I use
Backyard EOS with my DSLR to help construct imaging runs. The software has a focus guide that can be
used in conjunction with the live view functionality with the camera. When I have used this in the past with the
reflector telescope, I could get the focus value down to around 6, the idea
being the lower the number, the sharper the focus. At first light with the new scope, I achieved
the best focus I ever have, with a value of around 2.4. This must be testament to the optics in the
refractor. My first test sub frame take
with the scope was extremely sharp. I
used the DSLR at a relatively high iso so I could get some instant results, but
I was in no way disappointed. Though
quite ‘noisy’ in general, (a limitation of the cameras performance as opposed
to the scope) the image was crisp to the edge of the image.
The telescope comes with a fitting for a finder scope if
you wish to use one. However, along with
the 80 ED-R, I also bought a 50mm Starwave guide scope kit. This kit comprises of a 50mm aperture, 200mm
focal length guide scope and Altair’s GPCAM mono. The guide scope comes with it’s own scope
rings and mounted on a guide stalk. This
fits directly into the finder scope mount on the main telescope.

It was at this point, I found the only minor
problem with the purchase. If the guide
scope and camera are mounted onto the 80 ED-R in the suggested fashion, and
then a DSLR is attached to the focuser, the whole ensemble does not balance on
the mount. There simply too much weight
present on the focuser end of the rig.
Loosening off the clutch on the mount just sent the whole scope spinning
around until scope pointed up in the air and focuser towards the ground. I had to look at options of how to combat
this issue. I needed to get some of the
weight further forward towards the dew shield end of the scope to try and achieve
a better balance.
By looking around at picture on other users set ups, I
could see that a more popular way of arranging a guide scope to work with a
telescope is to piggy back the guide scope onto the back of the telescope. Fortunately, I had a spare dovetail bar, and
I could drill some suitable holes in it.
The new holes allowed me to piggy back the spare dovetail bar to the
scope rings of the 80 ED-R. Following
from there, I could also then attach the scope rings for the guide scope. All of this means that the weight of the
guide scope kit at least is distributed further forward and along the length of
the telescope. It still doesn’t balance
perfectly, but it much better that it was.
 |
| The piggy back method of mounting the guide scope means that the weight of the scope is much further forwards. With the weight of the DSLR, balance is still not right, but it is better. |
So, they are my first impressions of this impressive piece of hardware. It's my first refractor, so I have nothing to compare it to in terms of refractor optics, but I am really pleased with the purchase. Now all I need to do is get out there and use it more!


Comments
Post a Comment