2 Clear Nights - Part 2
The Pacman Nebula - NGC 281
This isn't some random throwback to a popular 1980's videogame. For the benefit of the uninformed, there really is such a thing! The Pacman Nebula is given it's nickname because of the shapes similarity to the videogame character. It's high up in the sky at the moment, in the constellation of Cassiopeia, and though visible all year for us in the UK, it really is in a great position during the Autumn evenings. Visually, NGC 281 is a tricky target to observe without plenty of aperture, though it is magnitude 7.0 or thereabouts. It's much further away than Andromeda, at around 9500 light years away, but as is often the case with nebulae, the more time you can spend collecting data, the more extent of the nebulae you will eventually be able to reveal.Taking on this target was a bit of an unknown for me, but what I was willing to do was put in the hours to get the data. Because of it's current position, there are quite a few images of the target appearing on various groups and forums around the internet, so it was easy to get an idea of what I should be able to get on a successful evening.
Collecting the data
In one of my astrophotography books, the description of how best to image the target assumes the use of a mono CCD camera and a combination of filters. Well, I don't have any of that. The 183c Hypercam is a One Shot Colour (OSC) CMOS camera. Fortunately, the book also suggested that capturing the data should also be possible using such a camera.So, I set about getting everything set up. In the forefront of my mind when I come to compiling the imaging run was the accidental mistake I made earlier in the week where I inadvertently left a smaller ROI on the Sharpcap settings which meant that I wasn't using the full size of the sensor chip. This time, I made sure I put that right. As I mentioned in part one of this double posting, I always like to try something new each time I go out. This time round, I wanted to attempt my longest imaging run to date. I read many forums and posts of people quoting that they have collected 10, 15 even 20 hours of data on a particular target. I'm not in the position to do that. I haven't learnt how to break my imaging runs up over several nights and still get everything to stack properly. That's another lesson for another night. But, I could collect 3 hours on a single run, plus calibration frames. There are plenty of things that need to happen simultaneously in order to have a successful imaging run, so the target for this particular night was to get a good clear run for 3 hours. You could be mistaken for thinking that once the whole process is started, you can just sit back and let everything happen. In truth, it's not far off, but you always need to keep an eye on the computer, the focus, the progress of the data capture, the dew, the power supply for the mount, the guiding and local nocturnal wildlife even! That's amongst a few other things.
So, setting up the imaging run for 60 x 3 minute exposures and making sure that I had enough time to run off sufficient dark calibration frames after all the subframes were collected, I settled back and watched the data roll in.
The final image
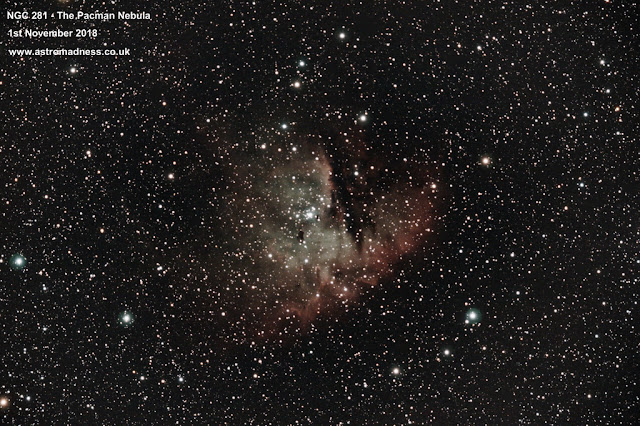
And here's the final image. I had two attempts at stacking. Once with the PixInsight software, and once with the DeepSkyStacker software. The latter produced the better stacked result, so that was the image I took forward to the rest of the processing steps in PixInsight. Notice the number of background stars in the image due to it's apparent position in the arms of the milky way!
 |
| NGC 281 - The Pacman Nebula. See the bright star in the centre of the image which represents the eye of Pacman! |


Comments
Post a Comment